Technical Documentation
Creating your own command handlers
Command Handlers are functions or properties that can be executed using the console. The demo scene that comes with the console has a number of examples of them in action. As you can't have two command handlers with the same name, it makes most sense to have these methods either as static methods or instance methods on a singleton (which could just be a MonoBehaviour you only ever have one of).
By default, the console has no command handlers. Creating your own command handlers is really easy. There's four easy steps:
- Put
using Opencoding.CommandHandlerSystem;at the top of the file you want to register the command handler in - Create a method or property to handle the command. Methods can take any number of arguments, but should always return void. Make the method do whatever you want the command to do.
- Add the
[CommandHandler]attribute above the method or property. - In your constructor/Awake method, call
CommandHandlers.RegisterCommandHandlersspecifying either theTypefor the class (for static CommandHandlers) or passing this (for non-static CommandHandlers) to register the command handlers. - If you're registering commands in a short-lived object (e.g. a MonoBehaviour that gets destroyed on scene change) add a matching call to
CommandHandlers.UnregisterCommandHandlersin yourOnDestroyorDisposemethod.
This is the most basic example of adding a method command handler:
using Opencoding.CommandHandlerSystem;

class ClassName
{
    // This will register the command handlers the first time the class is used.
    static ClassName()
    {
        CommandHandlers.RegisterCommandHandlers(typeof(ClassName));
    }

    [CommandHandler]
    private static void DoSomething()
    {
        // Do Something
    }
}
This is how you would do it in a MonoBehaviour that behaves like a Singleton with instance methods:
class Singleton : MonoBehaviour
{
    // Put some singleton stuff here...

    private void Awake()
    {
        CommandHandlers.RegisterCommandHandlers(this);
    }

    private void OnDestroy()
    {
        CommandHandlers.UnregisterCommandHandlers(this);
    }

    [CommandHandler]
    private void DoSomething()
    {
        // Do Something
    }
}
You can also add the [CommandHandler] attribute to properties. If you do this, the console will show you the current value of the property in the suggestions area:
[CommandHandler]
private float SomeValue
{
    get; set;
}
You should add descriptions for your commands. This allows your users (especially non-technical users) to see what the command does before they run it:
[CommandHandler(Description="This commmand starts a nuclear war. Use with caution.")]
By default, the method/property name is used as the name for the command. If you wish you can rename the command handlers.
class Vehicle
{
    [CommandHandler(Name="CreateVehicle", Description="This creates a vehicle where the player is.")]
    private static void CreateAtPlayerPosition()
    {
        // ...
    }
}
Static vs Instance CommandHandlers
I'd generally recommend static functions orproperties as command handlers for most uses, as this fits with the nature of command handlers - you can only have one command handler with a particular name.
The main exception to this rule is if you use Singleton classes of some description. With these, you should make sure you call CommandHandlers.UnregisterCommandHandlers when you have finished with the singleton (e.g. in the OnDestroy method if it's a MonoBehaviour). Using this method rather than static command handlers has the advantage that you'll only have commands registered that can actually be used (e.g. if some commands are only relevant in your menu, you can unregister them when you go into the game and vice versa).
What parameter data types are supported?
Most simple data types can be used as parameters:
- string
- int
- float
- bool [input as 1/0 or true/false]
- enum
- Vector3 [input formatted as (1,2,3)]
- Vector2 [input formatted as (1,2)]
- Color/Color32 [input formatted as RGB (0.3,0.5,0.8) or RGBA (0.3,0.5,0.8,0.1)]
Parameters can have default values, which will be respected by the console as you would expect. Parameter arrays are also supported.
There is special support for object parameter arrays (params object[]) when used with CommandHandlers.RegisterCommandHandler. In this situation you can specify the actual type (rather than 'object') of the parameters via an argument of RegisterCommandHandler. This is useful if the actual types are defined elsewhere (e.g. on your game's server).
Using from UnityScript/Javascript
CommandHandlers can be created in Javascript in the same way as in C#. The only real difference is that you place @CommandHandler before the method or property you want to register rather than [CommandHandler].
Dynamic CommandHandlers
Version 2.1 adds support for 'dynamic' command handlers - command handlers that can be registered and unregistered at runtime, without attributes being added do your code.
To register a method as a command handler, just use CommandHandlers.RegisterCommandHandler. For example:
CommandHandlers.RegisterCommandHandler<string, int>(DynamicallyRegisteredMethod);
private static void DynamicallyRegisteredMethod(string aString, int aNumber)
{
    // ...
}
There are overloaded versions of RegisterCommandHandler that allow you to specify the name and description for the command.
You can unregister a method that you've registered this way using CommandHandlers.UnregisterCommandHandler.
Multiple commands per handler
It's possible to register multiple command handlers to a single function if you use CommandHandlers.RegisterCommandHandler. In this case you can use CommandHandlers.CurrentExecutingCommand to detect which command is actually executing.
Custom auto-complete options
A really powerful feature is the option to add your own auto-complete options to parameters. This can make the console much faster to use, especially on mobile devices where tying can be a bit fidily and error prone.
To do this, you should add an Autocomplete attribute before the parameter that you want to specify the options for. This needs to have two parameters - the class and the name of a method that will provide the options. This method must be a static method that takes no parameters and returns an IEnumerable<string>. It doesn't need to be in the same class as the CommandHandler.
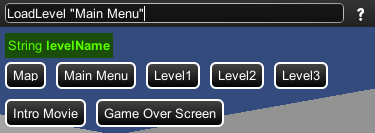
Here's a common use for this (shown in the screenshot above) - providing a command to switch level and a list of possible levels (note that this example doesn't include registering the CommandHandlers):
class LevelLoader
{
    [CommandHandler]
    private static void LoadLevel([Autocomplete(typeof(LevelLoader), "LevelAutocomplete")] string levelName)
    {
        Application.LoadLevel(levelName);
    }
    public static IEnumerable<string> LevelAutocomplete()
    {
        return new[] {"Map", "Main Menu", "Level1", "Level2", "Level3", "Intro Movie", "Game Over Screen"};
    }
}
Note: Parameters are allowed to contain spaces. If they do, you'll need to surround them with quotes - for example LoadLevel "Intro Movie". The autocomplete system will do this for you automatically if you use the suggestion buttons.
Preventing touches going through the console
You probably want to make sure that touches/clicks on the console don't go through to your game. Unfortunately, Unity doesn't provide an easy way to do this universally, so you'll need to add a few lines to your code. At it's most basic, just check to see if DebugConsole.IsVisible before you handle any keyboard, mouse or touch input.
NGUI
If you're using NGUI, you can easily prevent input going through the console by modifying UICamera.cs. Find the line:
bool handlesEvents { get { return eventHandler == this; } }
Change it to:
bool handlesEvents { get { return eventHandler == this && !DebugConsole.IsVisible; } }
Custom open gestures
Currently the console only has two touch-based methods for opening the console - swiping two fingers down the screen and holding three fingers on the screen for about half a second. You can select which method to use in the Settings section of the DebugConsole prefab. If you want to write your own method for detecting touches for opening the console, select the NONE option. You can then implement your own geture recognition that modifies the DebugConsole.IsVisible property.
If you're interested in having other gestures built in, let me know.
Build Process
TouchConsole Pro comes with some scripts to assist with builds. This section outlines how these work.
Removing TouchConsole Pro from Final builds
TouchConsole Pro comes with a custom build pre processor that makes it easy to remove it from your game when you do your final builds - you wouldn't want your customers using it would you! You shouldn't need to modify the build pre-processor itself, but feel free to do so, if need be!
By default, the TouchConsole Pro is set up so that if you do a build without the development build setting in Build Settings Window set, the console will be removed. It's also set up so that if you set a preprocessor define called FINAL_BUILD in the Scripting Define Symbols section of the Player Settings, it will be removed. It's up to you which of these makes the most sense for you, based on your existing build process. Both these options are customisable on the DebugConsole prefab.
Native plugins
TouchConsole Pro comes with two native plugins - one for iOS and one for Android. These plugins allow you to copy and email log messages.
You'll notice (if you care to look) that the BuildPostProcessor editor script includes a step that deals with integrating the iOS plugin Objective-C code into the Xcode project when you build. This is only used with Unity 4 - Unity 5 has built-in support for integrating the required files into your Xcode project. Hopefully you shouldn't need to touch this, and it should 'just work'.
Customising the log emails/exports
The email functionality of the console is great for when you want to copy a log off device for further analysis or your QA testers want to report bugs. You can see an example of a customised log email here. You can customise the log emails that are sent, attaching extra files or extra information in the message.
Here is an example:
using System.IO;
using Opencoding.Console;
using Opencoding.Shared.Utils;

// ...

DebugConsole.CompleteLogEmailPreprocessor += email =>
{
        File.WriteAllText(Application.persistentDataPath + "/save.dat", "Imaginary Save File");
        email.Attachments.Add(new Email.Attachment(Application.persistentDataPath + "/save.dat", "application/octet-stream"));
        email.Message += "\n\nYour imaginary save file is attached!";
        email.ToAddress = "youremail@domain.com";
        return true; // return false if you want to prevent the email from being sent
};
using Opencoding.Console;

// ...

DebugConsole.SaveFileProvider += () =>
{
    return new[]
    {
        new SaveFileData("SaveFile.txt", "Your Save File Contents", SaveFileDataType.TEXT)
    };
};using Opencoding.Console;
//...
DebugConsole.GameInfoProvider += () =>
{
return new List<KeyValuePair<string, string>>
{
new KeyValuePair<string, string>("Current level", "Level Name"),
new KeyValuePair<string, string>("Score", "42")
};
};Memory
The console uses around 90K of texture memory on iOS, hopefully this isn't too much to be a big issue for you - let me know if it is. You should bear in mind that when the console is removed (e.g. in a non-development build, by default) none of its textures will be loaded as nothing will reference them.
Stripping
If you have stripping (on iOS) enabled for your project, make sure that you have the TouchScreenKeyboard class excluded from stripping in your link.xml file (see here for link.xml documentation). A default file is included with the plugin, but if you haven't imported it, then here's the default:
<linker>
       <assembly fullname="UnityEngine">
               <type fullname="UnityEngine.TouchScreenKeyboard" preserve="all"/>
       </assembly>
</linker>
What are all the files?
- Opencoding
- 3rdParty: Unity's Xcode project modification system (see Build Process)
- Console
- Demo: A demo scene and associated code. Run this to see some examples of how the console works. Delete this if you already know!
- Editor: A script that deals with removing the console when you build final build. See Build Process for more information.
- EmailTemplates: HTML files, used for generating full-log emails.
- Images: The images used to make the UI. See 'images' below.
- NativeMethods.cs: Contains calls out to the native plugins. See Native Plugins for more information.
- Prefabs: Contains the one-and-only Console prefab. Drag this into your first scene to get started.
- DLLs: The DLLs that contain the logic for TouchConsole Pro.
- Plugins: Plugins for iOS and Android that handle emailing and copying log messages.
- 3rdParty: Unity's Xcode project modification system (see Build Process)
- Console
- Demo: A demo scene and associated code. Run this to see some examples of how the console works. Delete this if you already know!
- Editor: A script that deals with removing the console when you build final build. See Build Process for more information.
- EmailTemplates: HTML files, used for generating full-log emails.
- Images: The images used to make the UI. See 'images' below.
- NativeMethods.cs: Contains calls out to the native plugins. See Native Plugins for more information.
- Prefabs: Contains the one-and-only Console prefab. Drag this into your first scene to get started.
- DLLs: The DLLs that contain the logic for TouchConsole Pro.